Search This Blog

Tuesday, February 16, 2016

Tackling your first garment project (sewing for your darlings)


My longtime friend is tackling some dresses for her DDs and needs a little guide to her pattern readying - I thought recording it here might help her have a reference to return to - and, it might work for others too!

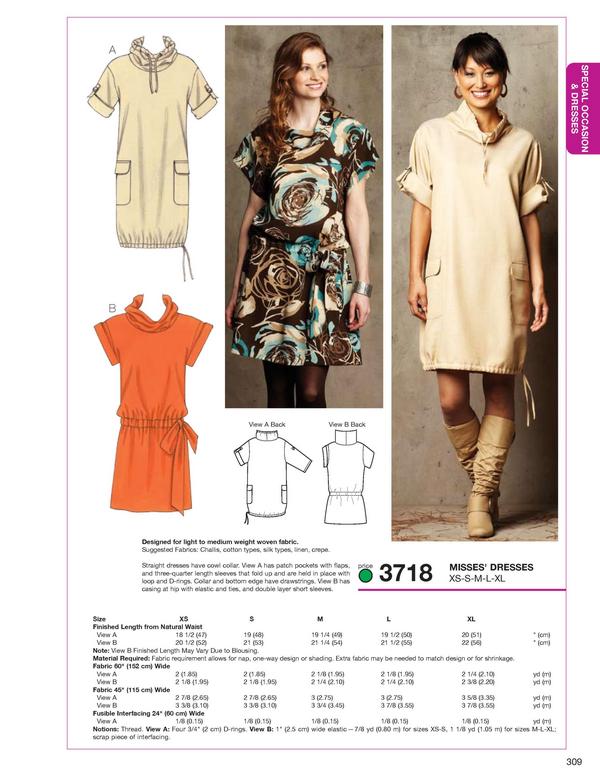
Either on your pattern envelope, on the website where you downloaded the pattern, or sometimes inside with the instructions you will find a size chart that correlates body measurements with the pattern's sizing.  Note that these might not (in fact, rarely) lineup with RTW sizing.  I have captured an image of sizing from a Simplicity pattern close to what my friend is starting with - you should definitely use the sizing chart for your particular pattern.

HOT TIP:  it would be a really great idea if you had the following measurements BEFORE you buy your pattern - that way you make sure you buy the correct pattern size group.


Pattern Sample: http://www.simplicity.com

I used an image of the words above to eliminate those creepy crawlers from zoning in on some keywords....  I hope you can see the words.  The key trick is the waist marker: tie a piece of elastic or a ribbon snugly  around the waist and get your darling to wiggle around until it settles - this will be the narrowest spot - the waist.  Leave the string in place, and measure.

Once you have made the measurements, use a pencil, or on a copy, circle the measurements that you have recorded.  Note - your babies will change measurements constantly (my twelve year old grew 6 inches this school year) so try not to permanently mark the pattern: that will complicate future recording of markings.
This is a little ahead of the game, but: if you are able, trace your pattern rather than just cutting it out of the printed paper. This will allow you to return to the pattern again later when your child's measurements change, or when the tracing has become tattered from use. Before you get started, take a minute to lightly iron/press your pattern paper. Tracing is easily done using some sort of transparent paper, and I find it easiest if the table top I am using is light coloured. If you can't trace, start with a highlighter to mark your pattern size, take note of the method for blending a pattern size below.
It will make tracing your pattern very easy if your child's measurements all fall into one size, but that's somewhat unusual.  Does your darling's measurement look like this on the chart? Let's start with the red circles:

Children are often little cylinders or pears - and this is NORMAL.  The size chart is a nicely averaged series of measurements (and the model the company uses changes from region to region and over time) -  always measure and never take offence - aren't we all unique little snowflakes?
Now, take a look at the blue line above - The garment measurements indicate the ease in the pattern is 2 inches at the chest - there's room to breathe, and a little room to grow. Over time you will develop a sense of how much ease you need for different pattern/fabric/fashions but my experience has been that I can usually start with what the Big 4 suggest (McCall's/Vogue/Butterick/Simplicity... Kwik Sew and Burda get included in there - these pattern companies have a standard that (for each one) is consistent, and usually tried). I always check PatternReview.com to see if there is any head's up from another sewer/sewist - an opinion that the sizing is generous might have me make a trial garment before I cut into my precious fabric.

So my example snowflake is clearly about to grow - the belly is lovely and full - knowing that my darling is going to need a little extra room in the belly is going to help me greatly.
I am going to blend my pattern to allow me to make room for the belly and booty.  

The chest is a 7 in this pattern - and then the darling needs a jump of room for the belly to a 12 (just to be sure I will go back and remeasure.... it's easy to make an error, and that's a big jump but this snowflake IS just 2 and 1/2 inches bigger in the belly than the pattern's model.)

So what's blending?  It means that when you lay out your pattern pieces you are going to take note of where the waistline indicator is, and you will start by tracing the size seven line at the chest and above, but as you approach the waist you will gradually shift you pen to tracing the 12 - the grade should be consistent on each piece.
Now - where is the waistline?  You took a measurement above for the back-neck to waist - and the pattern indicates (by my 4th red circle) that my darling snowflake's waist falls at the size 8 waistline marker.  The pattern should show a mark at the waistline.

On the sample Simplicity gored skirt pattern above, you may have 8 pieces to make the skirt:
  1.  1 piece for the 4 side panels (cut 4 of the same piece, 2 at a time with fabric right sides together),
  2.  1 piece for the front (cut 1 on the fold), and,
  3.  1 piece for the back (cut 2 at once, right sides together).  
To ensure consistency, on all three pattern pieces,  use a ruler, starting at least 3cm from the top edge mark a line to start the blending on the size 7 line and then 4cm above the waistline (see above) mark a line to complete the blending then below the waistline you will continue following the size 12 .  If this were a fitted skirt (or pants) you would blend back a size at the hips, but this skirt is loose and won't suffer from the volume at the bottom, and you might lose the desired shape. I find it easiest to draw a straight line from one mark to the other and then if necessary go back and imitate the curve of the pattern's cutting line if there is a curve.


On this dress, the cap sleeve is snug at the arm - take a minute to measure your darling's bicep - the pattern might have this measurement indicated - usually on the pattern piece itself (the bust, waist, hip and bicep are usually indicated with a circle with a cross through it).  If the pattern is too small you may want to  expand the sleeve a little - this can be done without altering the sleeve head (the part of the sleeve that attaches at the shoulder).This is a good set of instructions for altering a sleeve from In House Patterns.
The bust, bicep, waist and hip might be marked on the pattern with this symbol, usually accompanied by the garment's measurement at this location.


When you trace, carefully copy the location of the pattern markings, taking care to mark the notches especially. On the sample Simplicity pattern there should be notches to match the skirt to the bodice.  Always take a minute when you are cutting to notch the fabric accordingly, and to add notches at centre front, centre back, and at the foldlines of pieces cut on the fold (often centre front/back).

There we have a start on getting ready to cut the fabric - make sure you wash your fabrics ahead of time, and have your cutting tools ready. I'll make another entry in this blog for cutting tips and tricks, later.


Wednesday, February 3, 2016

An Goose-Se'de Heby - may your tribe increase

I have no idea how to spell what my father says periodically.  He announces: An Goose Sa De Heebee! May your Tribe increase!  once in a while - the same way he calls out "My god, she cried with accent wild!" or suddenly starts spouting another poem memorized in his youth.  My dad's a bit of a genius in my books.  I caught myself wanting to write his exclaim/blessing at the end of an email today with no knowledge of how to spell it - and uncovered the source of the quote:
Abou Ben Adhem (may his tribe increase!)
Awoke one night from a deep dream of peace,
And saw, within the moonlight in his room,
Making it rich, and like a lily in bloom,
An angel writing in a book of gold:—
Exceeding peace had made Ben Adhem bold,
And to the presence in the room he said,
"What writest thou?" —The vision raised its head,
And with a look made of all sweet accord,
Answered, "The names of those who love the Lord."
"And is mine one?" said Abou. "Nay, not so,"
Replied the angel. Abou spoke more low,
But cheerly still; and said, "I pray thee, then,
Write me as one that loves his fellow men."
      The angel wrote, and vanished. The next night
It came again with a great wakening light,
And showed the names whom love of God had blest,
And lo! Ben Adhem's name led all the rest.

Leigh Hunt
The Book of Gems: the Poets and Artists of Great Britain.

 Ed. Samuel Carter Hall. Saunders and Otley, 1836-38

The universe (and my father) have blessed me with a little guidance tonight.  I have been considering a new recreational path to pursue - and now I know it is the right one. More on that another time.

Thursday, January 21, 2016

Sewing Room Photo - a breakdown of "what's up with that mess?"

So - we shared images of our sewing rooms today - here's a map of what's up:


  1. I received a notions Christmas Tree from my niece (the 4T Chickadee) as a gift - it's full of tape measures, thread, button, and stuff - it holds a place of honour on my sewing table.
  2. I have a RTW size dressform for teaching people how to sew (so they don't mess with my body-double dressform)
  3. Giant wipe-off board with measurments for my friends, projects, family, - this rocks
  4. thrifted sewing machine that needs some attention.  Brother Walmart special, but it was cheap!
  5. My awesome Husqvarna Opal
  6. McCall's poster of patterns that comes when I order patterns online - it's currently acting as a slide for my thread scraps into the convenient garbage can (I can't reach very far while I am healing)
  7. My body double - currently named old me - I need to re build her for my post surgery body.
  8. A GIANT mirror (old sliding closet door)
  9. 27 year old Elna 4thread overlocker
  10.  Sewtionary and Betzina's Fabric Savvy
  11. 25 year old cutting mat
  12. Fuchsia!
  13. Iron (for reference)
  14. Built-in Vacuum (so handy!  the hose is on the floor)
  15. Zippers, Finishings, etc
  16. Pattern and fitting tools
  17. hanging patterns
  18. Stash Bins (there are many up there along a long shelf)
  19. Scrap bins (two wire basket cupboards)
  20. a peek at the top of my lower stash (see 34 if you can find it)
  21. under the table stash
  22. end of the table stash
  23. laundry tub stash (just kidding - that's current projects #1)
  24. Iron (for reference) on its board (aka work surface #5 - the only clear one)
  25. the serger for reference (see #9)
  26. Pattern Drawer (Lady clothes)
  27. Pattern Drawer (kids, Men, Home Dec, and PDF Instructions)
  28. the handiest little magnet cup - it's a locker tool
  29. Paper and Envelope stash
  30. Paper Trimmer (for PDFs)
  31. books
  32. cupboard of buttons and fasteners
  33. Hanging patterns
  34. lower stash
  35. UFO - duffel bag
  36. My unsolicited Christmas gift from my hubby - WINNER - seam ripper kit
Not Pictured: My Trims stash and Ironing Tools cabinet - and Current Projects #2 and #3 (on the floor in bags under the ironing board)

Fabric set aside on mini bolts

My Upper Stash


My Trims stacked up next to the mini bolts


My Husband's gift of height to my folding table


Serger thread stash in the serger table

My monitor above my sewing table - it's an old photo, there's no computer there now - I move it there when I am in a project

My brag book of stash snips


A shot of tidier times

Wednesday, January 20, 2016

My first homemade bra - a run through the Seamwork Florence

Have you ever made something into a much bigger deal than it turned out to be?
 I mean, Holy Hannah - this was easy,  EASY.  After all my hmmmming and hunhhhhing I jumped in with buying some cheaper supplies Monday night, cutting Tuesday lunch, sewing for a few minutes Tuesday Night, and finishing at lunch Wednesday,  (less than 3 hours, for sure)

It's a rough up of the pattern from the February 2015 issue of Seamwork: the Florence Bra (3006)
Now, I have some funny bra baggage going on right now, but really, I made too big a deal about this... it wasn't a risk at all!  It took no time, and the cost:
  1. I went out and bought some 6" lace for $1.15
  2.  used some $1.25/m Fold Over Elastic, and stitched it folded
  3. Paid $2.40 for some plastic bra strap thingies (loops and sliders)
  4. Used some knit lining for the side cups.
All in All, I figure: $3.85 to make a bra - and it's not bad!   When I hung it on my dressform I was a gobsmacked - I giggled.  I burst out laughing - it looks pretty damn fine (even with my experimenting with stitch length and width)!  I bragged about it to my BFF, and texted out to my DH and SIL - I put it on Instagram.  What the hell was I worried about?

I'll get hubby to fit the back seam for me tonight - and if it's right, I'll leap into making some more for practice before my kit comes from Blackbird Fabrics... if anyone is thinking about gifting me something - I'd also like to try the Watson Bra  


Tuesday, January 5, 2016

Stash Busting: 2015 success, my 2016 approach

How many zippers are too many?
It's a rare apparel sewer who doesn't have at least a few projects lined up.  And stashes develop as we start rearranging the queue and the project from last Spring becomes waylaid to next spring, and eventually the toile shorts become so passe that the fabric gets packed up for "something someday".
I have been sewing (and lining up projects) since I was 16 -that's 25+ years of queue - jumping!  My fabric stash is a wonderful concoction of past intentions.   I once sewed scarves for my friends, and have a weird collection of fur fat quarters.  There's a strange collection of upholstery samples that I thought might make nice toiletry bags, and I have
upholstery samples
picked up plenty of thrift store zippers to accomplish this.
The wonder of our corner of the Internet is all the initiatives available to guide us through our sewing adventures, and I am especially comfortable with a group of sewists who are Stash Busting -all trying to put a halt to the accumulation of someday something fabrics, to reduce, reuse, recycle from our own fabric stashes.
While most of the team measures their piles of fabrics, I have a different approach to quantifying my stash busting commitment, I keep track of projects.  While my Facebook Friends in the Stash Busting Group are declaring intentions based on yardage, I have declared the following:
  • I will aim to bust my stash by committing to 48 projects that use fabric bought under a different intention. (This worked really well for me last year)
  • I hope to isolate my stash to the bins already in my sewing room, and to eliminate the queued fabric pile (the fabric that no longer has a committed project).  
  • I will sew each of the 2016 Bag of the Month and muslin 1 Seamwork pattern from each issue, or not renew my subscriptions. (Burda Style was not renewed for 2016 for exactly this reason)
  • I will enter at least 1 Pattern Review contest each month (I found this has pushed my sewing envelope, improved my stash busting success, and I enjoy the challenges) and participate in each month's theme.
  • I will prioritize my family mending and hemming.

The bins should be my stash limit
This is so just the tip of the iceberg

I'm not able to quantify my stash in a healthy way.  But I don't mind. It is organic - I accumulate through thrifting,  donations, and impulse purchasing and I  would like to work like a conservation authority: keep my stash in balance,  through healthy attrition and prudent addition.
I have improved in my impulse control as a result of the stash busting group, and the stash bust projects have been highly successful for me.  

Yay for my success in 2015, and "you go, girl!" for 2016.

Breast Surgery - preparation for and a little extra for sewists

I recently had a double mastectomy,  and I was fortunate to have reconstruction as well.  I am just starting to see the light at the end of the tunnel, and thought I should start jotting down my thoughts while I have this perspective. 
As I approached the surgery date I was desperate for advice on what I could do to prepare.  I didn't find much, so I dug deep.  I remembered that my cesarean surgeries immobilized me, so I signed up with a personal training program and started developing some foundation muscles.  Now, before you abandon me, understand: I am a curvy girl - I walk regularly, and over the years I have been fit several times, but I am NOT a model of healthy physical fitness.
  • I love yoga, but can't afford studio yoga. But I pulled out my mat and cds and started rebuilding my stash of tricks to combine my mindfulness with poses that focused on stretches.
  • I invested in the 6 week program offered by Tailored Training (they are an excellent, pricey
    The Bear Crawl, how hard can it be?
     Babies do it!
    gymn,  and all the staff have significant physical health training - they are kinesiologists, physical therapists, nutritionists and have the paper to back it up) and struggled my way through the first few weeks until I was able to keep up with the group training sessions.  The whole experience was great, but I couldn't afford to stay with the team... but again I built my toolbox: in particular, the Turkish Get-ups, Bear crawls (see #5 on this page), and the more nebulous skill of breaking the goal into achievable increments was a big help.
  • I reactivated my Curves membership ($10 a week I could afford! ) and hit each visit with everything I had.

So, Advice #1: no matter how soon your surgery is, do some work on your fitness toolbox.   Drop a few pounds, sure, but more importantly : get your body ready to be able to get up off the ground without using your hands.
Ok, what?  Seriously, you need to understand: your body will be compromised by the surgery, you will need to use your core and legs to do all the work.  I was so happy that I was able to use the toilet on my own, and I was able to get out of bed without asking for help.  It helped, a lot!

I sew. A lot.  But I had no idea what I needed to sew for myself to get organized  for post surgery.  In the end I did nothing.  What I wish I had known:
Advice #2: get a couple warm up suits and a front opening bra (or two) with the following features:
  • A) Pockets. 
    Pockets to hide your drains
    I had drains for several weeks, and in needed to put the bags out of sight at waist level.  I had a 2 light weight hoodie cardigans that I wore in constant rotation because the pockets were perfect.
  • B) Front openings. I couldn't lift my arms for a few days, and now if I want to dress myself, a cardigan with a zipper front is perfect.
  • C) Smooth, soft, jersey with good drape.  Reduce the risk of catching terry loops or fleece on stitches, tape, or incisions.
  • D) Elastic waisted pants.  Think bathroom with limited arm maneuverability.  (I made a few pairs of Hudson Pants - and they have pockets!!)
  • E) I needed a little bralette with a front do-up.  I missed that boat.  I am now into a light fitness top for minimal support that won't compress my armpits.
  • F) my doctor recommended putting feminine pads in my old front opening sports bras for comfort.  Go buy some cheap pads for this purpose, it's the padding and the smooth surface that works especially well, the flexible foam la-la-la core meant nothing.

"Cleansing Bottle"
Trust me.
Advice #3.  Bathroom stuff:

  • Take the stool softeners the Dr recommends. They aren't a laxative, don't worry.  They are necessary with the painkillers.  
  • Drink a lot of water. Get a water bottle with a spill - proof spout.  I have one with a trigger that opens and closes the spout. 
  • Stock Up:  Panty liners, yeast topical cream, the little squeeze bottle (the hospital provided mine) for your bits, and all the stuff you might need if you have bum issues (like hemorrhoids) be prepared so you don't have to send someone on a strange shopping trip.


#4:  Sewing addiction advice.  Get as much cutting out done ahead of time as possible.  Cutting is the most difficult of the process, the squeezing of scissors or the pressure needed to use a rotary cutter may not even be possible.  I found I had a lot of back pain from my shoulders being pulled forward by my pec muscles, and the sewing position was agony.  I did little bursts of sewing, planning, hand stitching.  If you blog, maybe concentrate on your backlog (this is why this posting exists) will keep your brain busy.  and start a pin board of things to read:  you will surf yourself to boredom in recovery.

Monday, December 28, 2015

Strategy for Fabric Busting in the 2016 Pattern Stash Contest


Have you figured out your pattern attack?  I've decided to hit my Seamwork backlog since their sizing runs to accommodate my dimensions, so alterations will be predominantly grading instead of slash and spread.


Now it's time for fabric.  I have a large percentage of my stash occupied by other people's fabric.  Really nice fabric, mind you, but in colour-ways I wouldn't normally pursue.  I am thinking that since I am whipping up what will essentially be wearable muslins I should start with wearable fabric that isn't precious (to me).


In this sort of contest your fabrics should be ready ahead of time: pretreated before you are ready. This step is easy for me. I usually wash my fabrics as they come into the house. I wouldn't say I am paranoid about germs and bed bugs and dust mites and odors (although listing them like that is giving me the jitters) but incoming fabric (especially other people's fabric) gets a run through the washer before it hits my sewing room.

The exception, of course, is wool.  Wool is treated as I sew it.  I have a plan to use a printed wool viscose for a skirt in the coming weeks, so as I psych myself up for THAT, I will be thinking through the prep.  This fabric is NOT a good candidate for the contest: wool easily doubles the time you spend on your project.  The cost,  pressing, shaping, shrinking, steaming, underlining and finishing of wool undermines fast sewing.  I like me a little slow sewing,  so I will probably start preshrinking this fabric this month, but I won't be including this in my contest.  (However, I may make a wearable muslin of the pattern for this contest...).


For the Main January theme for our group, Judy has us addressing our stash and stash organization.  As you prepare for this, consider our supplemental contest: what patterns are you using?   Grab the appropriate fabric for the patterns - don't mess around with the pattern's suggestions: if it says knits, grab a knit, if it says lightweight cotton woven, grab a pretty quilting cotton.  Switching up the fabric adds time for fiddling, adding in ease, and should be done when you are working with a rehearsed pattern.  Unless, of course, you are into self abuse.


A great strategy would be to pick 5 patterns that use the same fabric, and will use the same needles and thread.  This will mean constant sewing - and if you dedicated and VERY organized - you could cut all the patterns out at once and just sew non-stop.  (Insert hilarious uproar here - I know you exist Super-Sewer,  but that's insane).

 - but the strategy still applies -

If you have a serger, you know what I mean - you sew items that will work with the same serger thread back to back so that you can get away with NOT changing the thread back and forth.  This applies well to the approach to this contest - sew the seams, and switch to a double needle for hemming and hem several items at once - when your thread and needles work on several items, you create a production line environment and find efficiency.