Search This Blog

Showing posts with label A-line Skirt. Show all posts

Thursday, November 17, 2016

Washi Dress - this muslin exceeded its intent!


What a cute, comfy dress for the Autumn events that pop-up!
Which can also be purchased at IndieSew
I finally decided to make this dress when I realized that I needed a couple easy dresses for the winter indoor concerts we have planned - something easy to wear with boots and tights, and to layer with a cardigan.  This iteration was supposed to be my muslin, but the fit was so bang-on (I didn't need to narrow the shoulder or adjust the bust!) it was a go ahead.  - I managed to squeeze all of this out of 2m of a wide chambray.

The wrinkles abound because I have worn this twice since it came off the dress form. - Suck it up, buttercup - I am here to share, not be judged.


I was new to shirring on my machine - and this was ridiculously easy.  
The pocket was AWESOME - I am on the dress pocket bandwagon.


I made my own partial lining for the bodice using the pattern pieces as the template, and ended the lining as free floating ABOVE the rows of shirring.

At the sleeves I burrito'ed the whole bit to encase the underarm in the lining.

The front was similarly lined and freefloating.  I *might* look at attaching it at the waistline next time....  I'll see.  So far it has been easy to wear.


So for those of you who question "why" I would Hong Kong this fabric - check out the fraying from it's first wash - this is under the facing.

The Guts (Note my judicious  use of leftover bias tape - and the cute bursts of colour :)


The armscye looks like this when you burrito it instead of binding it - I did the front and the back in separate stitching and folding opeations, and understitched the lining to the notches front and back (well into the part covered by the cap).


So,  so super cute!  I made a little matchy Lisbon cardigan/topper as well... and felt really youthful and comfortable in this outfit

Tuesday, December 8, 2015

Mrs Claus - A-Line from scratch, M7254 Jacket, and Cypress Cape (Sewaholic)


 Remember the Opportunity?  OMG  I had so much fun!
Nov 21 has come and gone, and I revived my dress-up last Friday for a photobooth The costume worked out really well (that's all explained below).  The wig was a beast (too tight for my head), but the whole rest of the Mrs Claus at the nighttime parade experience was great.


The costume is designed for wearing outside in wintry weather, so you really don't want to be lazing about the house in costume. As pick-up time approached - my lovely friend and family assisted with bobby pins, white hair spray, safety pins and a kilt pin - we moved so fast we didn't manage to get decent readying pictures before we flew off into the parade grounds.  Santa is a fantastic date, and surprising mountain of a man - I felt like a little pixie next to him!  The float is  gorgeous, and the sleigh is made of (presumably aircraft) metal.  I was picked up at 3pm and got home at 11 - and it was a hoot!

The wig tops off the costume, my hair (as much as I already have a haircut suitable for Mrs Claus) is just too mousy for that silver foxette.  It's a Marie Antoinette wig and I pinned up a few of the dangly locks, and added a holly sprig to my bun.

I rescued a pair of glasses from the Tickle Trunk and found my Santa pin from the hospital auxiliary.  My tall winter boots did nicely, too.  Under it all I wore some awesome Columbia Omni Heat base layer (long underwear of sorts) featuring a candy stripe (I was being funny) and my Omni Heat white gloves.


But what of the incredible costume project?

The Skirt
 I used my A-Line skirt block.  Because the fabric was an upholstery grade velveteen/chenille I added an inch to the side seams, and an inch and a half to the center back.  I put in a heavier zipper than one would normally use for a skirt, but it needed to carry the weight of the skirt.  I used my curved waistband and made that sucker extra wide.  I faced the waistband in a solid canvas.  I wasn't risking anything with a lost securement, and after debating all the possibilities I decided to use a kilt pin for the fastener.

The weight of the skirt was totally reasonable for a costume piece, and actually cut the windchill very well.  The fabric held up and there were no wrinkles.

I had contemplated adding a hem band in fur, but this was unnecessary and with the potential of snow would have only reduced the longevity of the skirt.  If I ever get wear at the hem, I will edge in fur.


The Cardigan-Jacket


The main warmth layer for my upper body - the Cardigan jacket was made out of a fabric labelled Reptile-Fur on the Halloween clearance table.  In the photo of the fabric you can see the embossed texture on the fur - it IS reminiscent of crocodile or alligator.

It was a beast to cut this fabric - SUCH a mess.  I have a central vac and I really made use of it when I was working on this project.  I still have white fibers showing up on everything I sew.

The pattern for the cardigan is M7254 View C

The fabric has some stretch, but I interfaced the collar as per the directions to maintain the height to the roll of the collar.  I bought some red toggles for the jacket from Prym  - but the toggle straps separated from the tab - I restitched one, but decided not to rely on them.  I backed it all up with a safety pin (horrors!)

The cardigan was easy to make, and I love the process - I have used the Julia Cardigan until this project - I think I will shift to this pattern for future easy pieces.

The fur collar worked quite well for the costume,

 The Cape
The Cypress Cape is a doozy to prepare, but a joy to sew.
 Sewaholic Cypres Cape in red PUL from SimplifiFabric
55 pages of PDF!  I was seriously stressed about cutting this fabric.  I was worried that the project would get lost in my sewing room.  I was worried that it was too big.  The PUL scared me a little as it was so much finer (only 3mil) than what I had worked with in the past.   I finally sucked it up and started piecing the pdf, and then sorting out my layout for my work table.My worktable and rotary cutting mat were smaller than several of the pieces, so I rehearsed the layout and plan in my upstairs hallway.  I considered tracing the pattern onto the fabric, but decided to use weights and paper to cut piece by piece on the board, shifting the sleeve (the biggest piece and only one that was larger than my cutting mat in both length and width).

Now to the cape itself. - This is a gorgeous pattern:  The drafting is spot-on, the sleeves are clever and the hood has a lovely functional shape (it give you a great scope of view) - another sewist commented that it could be snugger to the face (but I have a big head - it was perfect for me)  I didn't test pulling it over the wig....

Notches matched, seamlines matched, and it went together beautifully.  I fumbled at the instructions for the opening - I will revisit the directions and let you know if it was chicken or egg, but be warned to take that step carefully.


Here's the whole caboodle:
The formal Mrs Claus pose


The full profile costume

check out the white eyebrows, and the candy striped base layer
(ugh, and the tight wig)

Here I am rounding up the vagrant elves!


Saturday, November 7, 2015

Stash Buster of Epic Proportions! Planning

I have been blessed with an OPPORTUNITY!
Years ago I worked for a great organization called Downtown Kingston! (exclamation mark included) working as the bookkeeper and secretary to several boards as a part of a great team of people.  When I left to manage my ex husband's business, and work as a controller at a Harley dealership, I kept going back to assist Downtown Kingston! with their events and festivals.


Over the years (10 years!?), one of my favorite recurring gigs has been the Nighttime Santa Parade.  I Guided Sparks, Brownies, Guides in the parade, I marshaled, I drove dignitaries, I waved to kids, I loved it.  I like people a lot, and this event is no ego for me, just a chance to see the faces of thousands of people having a great time.  It worked well as a single Mom, too: DS the Elder often came along for the ride, and got to meet some pretty awesome dignitaries!

So last year, I was assigned to chauffeur Mrs Claus to the event, and to drive one of the dignitary vehicles (the dignitaries usually walk, so I end up just driving an SUV at the start of the parade).  Mrs Claus had something go wrong, and couldn't make the parade - but my gig continued.

Then, in the Spring, I stopped in to drop off something to the office, and mentioned that I would be willing to stand-in for Mrs Claus if it ever happened again.  TA-DAH!  I got an email last month - they needed an understudy!  and this week? I am not just a bridesmaid this time!  Hello, Santa!

So up an'at'er!  I have a few weeks to make a costume (and of course I am not just whipping up a furry smock).

I have two donations to my stash that started the project:

  1. my SIL gave me some home dec fabric last winter - a red upholstery with dahlias in chenille
  2. my BFF's mom handed me some boxes when she was downsizing - and included was several meters of red satin backed crepe.


On the right above you can see the PUL I bought (a disappointing colour match, but such an investment, so I am using it).

So first, the Skirt.  I pulled out my A line block and added 1.5" to all seam allowances, and lengthened by 10", and lengthened the curved waistband by 6" on either end (my fudge factor) - I wasn't sure what I would need and Mainely Dad said it once and it stuck with me: cut your waistbands long - you can always shorten.
The upholstery was not an easy sew (and I am only half-way through hand stitching the canvas backed waistband), but I added the zippers, darts and shaping I think it needed:
That WAISTBAND!

So what's next?
Jacket:  M7254 View C in white "Reptile Fur" (what?   it was on the hallowe'en clearance table)
ValGal's version on Pattern Review was a lock for this pattern:

I will also need a muff for my hands and I hope to make this Die Nähanleitung zum Knöpfchen-Loop Autumn: (Katrin's is so beautiful)


So those are my essentials - All fur-trimmed, of course.


Monday, June 15, 2015

A Wedding!


We have been invited to a wedding!  In my age group, we have hardly any weddings - my friends are either long married or recently divorced - and the nieces are a few years away (I think).  There was a time when the fridge was covered in Save the Dates - but last week I got to post a new wedding invite over last year's (DB's wedding) S-t-D.

And, it's a colleague's wedding (DH's work buddy)....  What will I sew?
I am leaning towards a replica of B6053
MISSES' DRESS: Lined dress has bias neck and sleeve binding, princess seams, fitted bodice, midriff, side pockets, hem band (cut on crosswise grain), cap sleeves and exposed back zipper. Topstitching. Separate pattern pieces included for A/B, C, D cup sizes.
Designed for Light to Medium Weight Woven Fabrics.
FABRICS: Gabardine, Linen, Twill, Broadcloth, Denim.
*With Nap **Without Nap
NOTIONS: A,B: 20" Exposed Zipper and Hook & Eye.
I have sea-foam gabardine - the perfect wedding fabric!  (for you millennials, that's a joke - sea-foam gabardine is very 70's wedding fabric - but hey - it all comes back, right?)

Here are my other options:
M6711 (I will need to alter the skirt to be a little more full - I have an orange knit oh! and a gorgeous parrot blue knit - I could colour block!..... maybe not for the wedding, but as another occasion dress!)

\
S2406 I am thinking the maxi - perhaps in mint blue?  (like that's not sea-foam)

V2900 (15 pieces for this one)  DKNY, I love you.  I love this dress - there are princess seams and I could do an FBA... 

They are all summery - it's a July wedding, so it will be hot.... I have other dresses but these seem the most heat-palatable....  what do you think?


Wednesday, June 10, 2015

Pattern Review - Imagine Gnats: Alder Skirt {for women}

I am pretty excited about my skirt - so excited that here is a picture of it in need of a pressing!

I love the front of my Alder Skirt - I mean - REALLY LOVE IT!
Allie at IndieSew had some great things to say about the pattern, and I went with her recommendations and her review as my guidance - I made sure my fabric had some stretch, and I fit the skirt to my waist measurement, focusing on my Hip measurement for the pattern.
I also spent a great deal of time figuring out which version had the lay-flat pockets instead of the berry-collecting pockets.
On page 4 under "Cutting out Pattern Pieces" there is a note that
View B is the Flat Pocket Option.

MY RESERVATION IN RECOMMENDING THIS PATTERN:
My version needed a major alteration to the back of the garment (so great that I eliminated the elastic waist and sized it down significantly).  I am thrilled with the front of the skirt - I need to make it again to consider the back as designed and evaluate whether as-designed it is a skirt for me.

<UPDATE: What I did: Honestly I wouldn't recommend doing what I did: I chopped 6 inches out of the middle on grain-line from hem to waistband (as close as I dared to the darts) and then added two more darts and a center-back seam). - I think I am going to whip the skirt up in a quilting cotton (one of the recommended fabrics) and give it another go before I publish the review to PR.>

 I found that it was difficult to find pattern reviews for this item online, so I am offering some suggestions to encourage an approach to the project that will produce success.

Packaging:  

Overall this pattern is nicely packaged - the cover is attractive and colourful, the pages and font are nice (but a darker colour would have been appreciated, it is a little faint on the page).  This pattern needs a line drawing - I have searched and cannot find one;  there are very few rear-shot images of the skirt.

Sizing:
"2-22" (but actually comparable to extended sizing)

from the pattern package


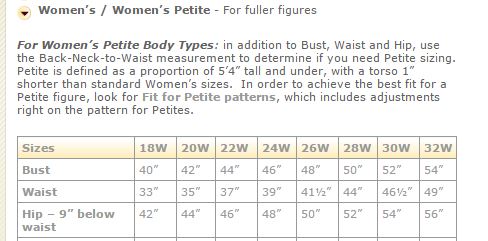
I am used to the garment measurements being available - and they aren't here. The sizing runs very Large.  I am a 35 waist and 54 hip, I am used to making adjustments - But I feel like the size chart is closer to the garment measurements on this chart.  I normally sew an 18 or 20 and I started with a 16 on this chart, and needed to alter down the back significantly.
The sizing is not reflective of what I am used to seeing. If we review the upper range of sizing and compare to the W sizing from Simplicity:
In the end, I recommend you mark your desired waistline and hip line on the pattern and measure, measure, measure.

Quality of Instruction

The instructions are clear, have good graphics - I didn't run into any vague directions - excellent.

Pattern

The pattern is well laid out, has nice colour features and markings are well drafted.  I wasn't able to activate layers, but the pattern would lend itself to this.
Lengthen/Shorten, grainlines, and key body measurements should be added. 

Further Recommendations

  1. Have your Ruler ready when laying out the pattern - you will need to draw-in the lengthen/shorten lines,
  2. Be prepared to measure yourself and the pattern - you will need to add your own hipline and waistline to the pattern, so prepare for that as well - and note that the garment is meant to sit low - on the hips. 
  3. Take your time and consider the pockets and the front design elements, and take time to ensure you have selected the correct pattern pieces for your desired project.
  4. The back - I found that there was an issue with the garment back - the gathering is extreme - consider your wasit to hip and consider adding additional or enlarging the dart.  Ideally the waist band at it's fullest extension should pull up over your hips - and no more - I found that there was far too much fabric and the gathering was awkward and not flattering for a small waist (especially a curvy figure with an high hip:waist ratio) (I suspect I will size down the back and leave the front where I already sized down).
  5. Start with a lighter fabric that can take the gathering at the waistband well.