Search This Blog

Saturday, December 13, 2014

The Julia Cardigan - palooza

There is a really great promo that rears up on the Internet from time to time at Perfect Pattern Parcel
PPP Logo
It's a package of patterns that you buy en masse at your self-determined price.

Recently, Parcel #6 was available and I splurged:
https://patternparcel.com/
Mostly it was the first 3 I wanted, but now I regret not paying a little more to unlock the bonus pattern.

The Bronte Top and Hudson Pant became a wonderful pair of matchy match PJs - I don't think I want to share a body shot photo.....  The fabric is an adorable silky knit (to which velcro on baby bibs absolutely ADHERES...)

I do want to make more of both that I might wear for public consumption - I need to do a FBA on the Bronte Top - I made the size that matched my measurements, but I am not fully thrilled with the fit, I think I will go down 1 size and then do a FBA.

The Hudson Pant is comfy and fits exactly as all the images on Google portray - I find them a manish, low rise, and sloppy - BUT COMFORTABLE!

Now I am making a bunch of The Julia Cardigan
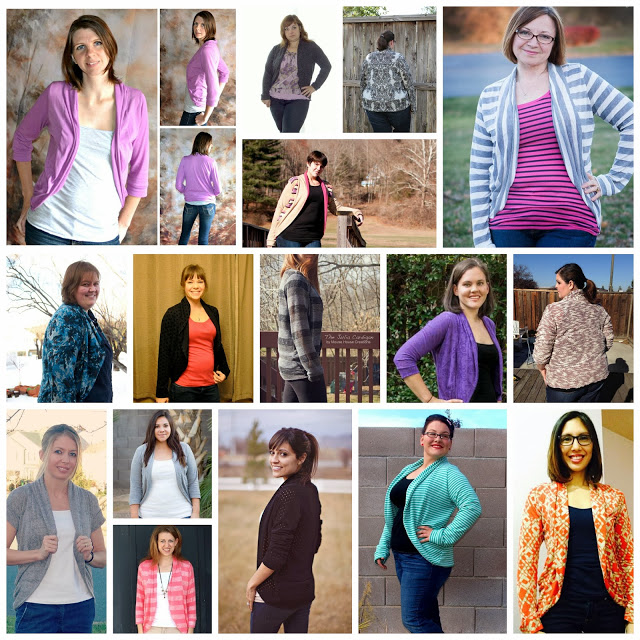
It suits a lot of testers, so I am giving it to people for Christmas (shhhh!)   I had some great vintage fabric that made a wonderful bohemian in the capped sleeve version, and another in two fabrics in 3/4 length, I have 3 more cut out that I am whipping together this weekend.  I'll post photos of the finished objets once they gifts have been unwrapped.


Tuesday, December 9, 2014

Fabric Fairy

Yes, Carmencita there is a Tweed Fairy - a member of a wonderful sorority of fairies who bless us occasionally with awesomeness at the Thrift Shop:


Evidence 1:
I just Bedazzeled for my very first time! I am not thrilled with my technique, but in the interest of fooling the 2 year old that it is a Frozen dress... or maybe a North Pole dress.... the bedazzeler came out of my "try this" pile. 


The bedazzler was a deal at my local Value Village recently - components in separate grab bags - it took me a bit to track down all the parts, it was like a 1990s scavenger hunt. I managed to score 3 packs of rhinestones in the dig along with the machine and it's components. 3.97 total.


Evidence 2:
See that stripe in the shot up above?  Value Village - $1.99 for 1.8m
A fuzzy Sweater Knit - perfect for the above mentioned 2 year old.  Also note the quilted, double faced jersey - awesome.

Evidence 3:
I have been wishing and praying for the perfect fabric for a project that will remain nameless for a few more weeks (check back after Christmas)
CHECK. THIS. OUT:

$5.99 for 2.5m  Can you hear the Hallelujah Chorus?


The [finished] Dragonfly Handbag


This was a exercise in developing my tenacity for powering through that mid-project minute where I begin to be disappointed in my product.  I like a great deal about this bag - and I dislike some aspects of this bag.  Who will be the recipient of this gift?  Not the gal that inspired it, that's for sure - it's way too red hat for her.  But seriously, look how beautiful it is!


This was a lot of disciplined work

But it turned out great - just not my style.


I have aunts who appreciate things - but now I have three possible recipients!
I'll have to contemplate.  (or make more)

I want a grey one.
Kenneth Cole Reaction 4 Easy Pieces Flannel with Crocodile Satchel,Grey/Pewter,One


Tuesday, November 25, 2014

Dragonfly Handbag for the Handbag Contest

I using another contest to drive me to work on a Christmas present.  I am making The Blossom Handbag by Amy Butler Designs that was on the Sew Mama Sew Blog forever ago.  It's from this book: Amy Butler's Style Stitches: 12 Easy Ways to 26 Wonderful Bags 


This is what the bag should resemble when I am done:

I have this adorable Olive Green fabric with a repeat of gold and red dragonflies on it.  That's the starting point.

Tuesday, November 18, 2014

Me Made Monday -DH installment

My honey has a new sweater!
The Finlayson Sweater from  Thread Theory Designs.  I'm thrilled with the results.

My biggest kudos go to the instructions and pattern markings for the neckline.  I was so thrilled with how perfectly everything lined up, and how easy it was.

I followed the Finlayson Sewalong and completed the sweater in 1 evening (cutting was complete the day before). 

This is a great project.

Autumn Koan

Suburbia Fall
Trash cans are our tumbleweeds
Dogs wear warm sweaters

Wednesday, November 5, 2014

Thrift Store Fabric and Findings

Several weeks ago, on one of my Value Village foraging expeditions I passed over a chunk of faux leather.  Hey, I thought as my hand ran over the yellow and brown mass, There's a Dinosaur costume waiting to happen!  And I moved on to some pink ribbing.

Overnight, I kicked myself for balking at the $5.99 price tag, and finally 2 days later I broke down and rushed over on my lunch hour to buy the fabric.  I reasoned that my 10 month old was someday going to be a 3 year old who would want a dinosaur costume.

And, the fabric became a part of my stash.   It was stacked on top of the bin that holds the remnants of my prom dress fabric (26 years ago) and some Nova Scotia tartan that I bought at a garage sale 5 years ago.

My stash in recent years has been augmented by thrift store, garage sale, and kijiji finds. I have been having fun with the penny fabric and making lots of little outfits for my niece.  I am severely limited in my disposable income, and my foraging provides a satisfying shopper's high.

Just a few weeks ago Patternreview.com announced a contest on their site that will run for 4, 1 week sessions.  Each week participants will have a set number of days to produce a project identified at the start of the block of days. I signed up for the challenge and when the first week's project was announced, an A line skirt, I started researching and pinning until I found the right combination of information and felt I could draft a skirt pattern from scratch.

Just before the contest project #1 announcement I spent a day shopping with my best friend, and dragged her to Danier and had her try on a bunch of outfits so I could vicariously experience the fashion I loved.  (Remember, I have a 10 month old).  When she caught her flight back home, a beautiful pair of leather pants in her baggage, I sighed sadly for more than one reason.

So I decided I needed to come up with something special for Project #1 and I was surveying my stash for a winning fabric.  Something unusual.  Something not too conservative. Something....

I wonder a little if the dinosaur skirt was meant to be:

My favorite new word is findings  and I have made it a game lately of buying up bags of buttons and zippers from the wall at Value Village.  I must have bought a bag of zippers from the same lot that the dinosaur fabric came from: there were two exact match zippers in my stash.  One is a perfect 20 cm invisible zipper.

48 hours until the submission "review" is due.  And I have a lovely dinosaur skirt.

Tuesday, November 4, 2014

Quick and easy curved waistband

Kudos to MellySews for the curved waistband cheat-sheet.  It worked!

  • While trying on the garment measured the distance from the top of the unfinished garment to where the top of the waistband would sit - this is the width of the waistband.
  • Measured the garment circumference at the waistline 
  • Added overlap for the opening
  • Divided waistline by 8
  • Drew 8 rectangles 1/8 garment circumference wide x width of waistband tall AND
  • Added a 1cm allowance on one side of the rectangles (for overlap for taping)

  • Measured my waistline
  • Subtracted my waist measurement from the garment measurement
  • Divided the Variance by 8
  • Overlapped the top edge of each rectangle by 1/8 the Variance
  • Taped the overlapping rectangles to paper
  • Used a Seam Gauge to draw in the seam allowance to draft the final pattern piece

http://makesomething.dritz.com/sewing-product-info/30-days-30-notions-sewing-gauge/#.VFkh8_nF95J


BzzAgent - Doing my Hair Nice and Easy!

I do BzzAgent stuff: I sign up and receive free products to try, and then I tell people about my experiences.  
This month I am testing:
 Clairol® Nice ‘n Easy hair colour collection


This is my hair with no product - dark blonde / light brown.

I did this. - I don't normally do this.

It turned out like this.

What I learned:
  1. You cannot expect to do this and not get some on you face, clothes, hands, towel, tub or baby.
  2. You should make sure, AHEAD OF TIME, that the baby can't get into anything you would normally take away from him.
  3. Time moves at an exponentially slower pace as you count-down 25 minutes.
  4. This is not the time to multi-task, but I was able to sort the clean laundry and get it ready to put it away, and play with the baby.
  5. Baby steps are best when adjusting your hair colour.  This was enough - it's a little reddish right now.  I am glad that it fades away.  There is an extended undo.  
  6. I might do this again, but I didn't like the tingling on my scalp.
  7. I am really glad I did a test spot first - I would have stressed about the tingling scalp if I hadn't made sure I wasn't allergic first.
  8. I am SUPER GLAD I am also testing Sawmill Creek Wine (also #GotItFree) - Colouring my hair was a big step for me - but it really was Nice and Easy.


Friday, October 24, 2014

My tactile Baby

My wee beastie and his love of locks.
He can't keep his hands off them.

When Big Kids knock at your door for Hallowe'en - treat them just like little kids.

My 11 year old is taller than me.  He has been planning and re-planning his costume for MONTHS.  He gets braces on Nov 6 (carefully arranged to follow Hallowe'en).  On the 31st we are taking him out of school early in the day so he can catch the train to his Dad's and get there in time to go Trick or Treating.  This is the event of the season for him.

 I have mentioned once or twice to him that this is probably his last year for going door to door. He'll be too big next year.  Then I read this brilliant article by Marion Franck and I changed my mind.

See, the kids from the nieghbourhood come by after school sometimes and (shhh don't tell anyone) play dress-up in the basement with all of our old costumes. Boys like creative play too, people.

It freaked me out when he wanted, at the age of 8, to be ghoulish for Hallow'een, but I let him do it. Kids need Hallowe'en costumes to take control of that they are fearful of - and to assume the qualities of those they admire.

What the Hell - I'll let him take charge of his imagination and be whoever he wants, and if it means, letting him trick or treat for a few more years, great.


Thursday, October 23, 2014

Ave gets it all - today a Belle dress for a two year old's birthday.

A rare standing still moment - the satin back crepe moved like a dream!

The button holes were pretty once I got the tension right.
It was the perfect dress for a busy little girl.


Thursday, July 31, 2014

More Paying with PUL - A Raincoat for Ave!


Mitering the corner with bobbypins instead of pins - Love the pretty Flannel Lining!

Thursday, April 17, 2014

Playing with PUL - A Babyville Boutique Project: Modify my favourite bib pattern

This is the finished project:

This is where I started:
This is my favorite bib shape.  It's from Kooshies / Kushies

Sadly, my baby is outgrowing my favorite bib.  We go through a dozen (or more) bibs a day with my little spitter, and I need more belly and spit retention (a.k.a. a pocket) on the bib.

DS#2 has a wicked cold right now, so forgive any unwiped elements:


I love how the bib covers the shoulders!  It is PUL backed, and has a terrycloth front (for excellent absorbancy). It has two snaps (I'm not a fan of tie-backs, but I get they are more economical - when I replicate this I am going to spring for snaps).

I have big plans to make a raincoat for my beautiful 18mos niece this week - but this is my first time working with PUL so I want to play with the product first - and so (sew) - a BIB!  Here's how it went:

Fabric: Babyville Boutique  Dinos "RawR"

  1. This is a sketch of the existing bib - since I plan to lengthen the bib I left the bottom untrimmed:
  2. Here is the extension piece overlayed.  The extension will also be the template for the pocket so it is a separate piece.
  3. I cut out the bib using both pieces (as one).  I found the PUL easy to cut with the rotary blade.
  4. On the fold, I cut the pocket front using the extension pattern as a new piece. (The candle was a handy pattern weight).
  5. Here's the pocket piece folded in half.


  6. Next I ironed the pocket piece - PUL sides together.  I read that this would bond the flap as one.
    I set the iron to the low Cotton setting.


    I turned off the Steam.


    I pressed by blocking sections (not moving the iron back and forth).


    It bonded perfectly!  And baby slept right through.

    nb: fold is like a knife!


  7. Next, I connected the pieces and basted the pocket on.  here are the particulars:
    70 or 80 (10/12) ballpoint needle

    Polyester thread

    Thread and bobbin same

  8. I used the Fold Over Elastic (FOE) from Babyville Boutique:


  9. I zig-zagged the FOE around the edge:


  10. I lapped the ends.


    The extended zigzag worked well on the corner:
  11. I applied a snap matching the pattern marking - I only needed the larger size from the pattern.

    I used the Babyville Boutique snap tool and snaps (the snaps are plastic and size 20, 60 sets per kit) 

    Using the awl enclosed with the tool set, I pierced the bib strap in the appropriate spot on each side 

     The tool works by compressing the pieces together, male side and female side are done separately


  12. The bib is complete:


I LOVE the bib - I have washed it several times using the machine, I have hung it to dry each time, rather than put it through  the dryer, and it doesn't show any wear.  It dries overnight easily.
1 load had hook and eye tape (a.k.a.: Velcro) in the mix and the FOE is fuzzy where the hook and eye tape adhered, so I caution against mixing the FOE and hook and eye tape.